Sony recently announced the Xperia M smartphone with 4-inch capacitive touchscreen,1GHz dual-core processor and 5MP rear-shooting camera.
Owners of the Xperia M can now root both the C1904 and C1905 models running Android 4.1 Jelly Bean firmware.Using the Gandalf exploit, the Sony Xperia M can be rooted to allow owners to flash custom ROMs,gain full administrator privileges and swap the memory.
Be reminded that you need to meet all requirements before rooting the smartphone.
Prerequisites
1.The Framaroot rooting tool is only applicable to the Sony Xperia M C1904 and C1905 models. Never attempt the tool on other models or suffer unforeseen consequences.
2. Your Sony Xperia M must be unlocked from any network carrier.
3.Enable the USB debugging mode on your device. Go to "Settings > Developer options > USB debugging mode."
4.Create a backup of all personal information, settings and data files stored on the Xperia M.
5.Make sure that the battery level is at least 50 per cent.
6.Download the Framaroot tool .apk file to your device. You can download the file on the computer as well then transfer it to the SD card of the phone.
7.After rooting if the phone starts rebooting automatically then try using different version of Framaroot.
Warning: Rooting your Sony Xperia M will void warranty.
We are not liable for any warranty issues or errors which may occur on your smartphone.
Read, understand and follow the instructions carefully to avoid damaging your device. Do this at your own risk.
What we are doing here is
 A.Roooting
Download Framaroot 1.9.1 from MediaFire or 4shared
Download Rootfixer from MediaFire or 4shared
Download Simple Root Checker from Play Store
B.Installing BusyBox
Download BusyBox from Play Store
C.Installing Rootfixer from PC
Check out this youtube video tutorial Click Here
A- Rooting Procedure
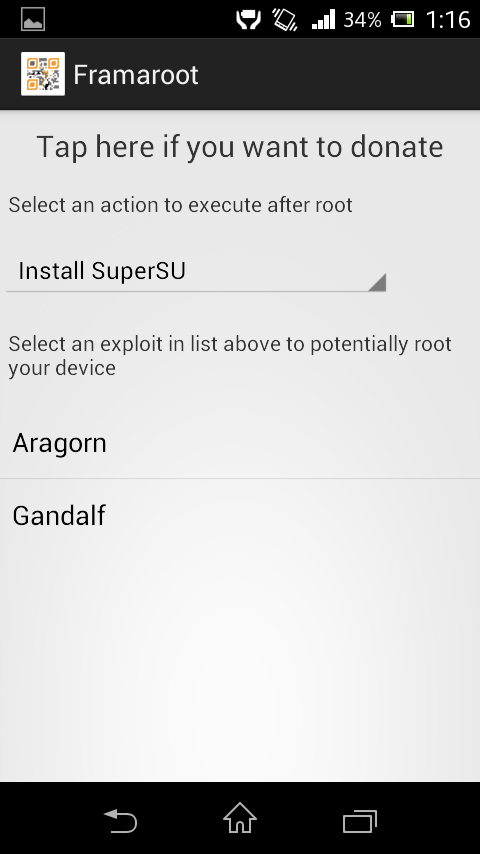
1.Install and Launch the Framaroot app.
2.Click Install SuperSU and then select Gandalf Exploit.
[Do not select any other exploit as it can cause permanent problems on the handset].
Once the rooting process has been completed, you will see the following text:
 "Success, Superuser and SU binary installed."
*The rebooting may take some time due to the rooting process.
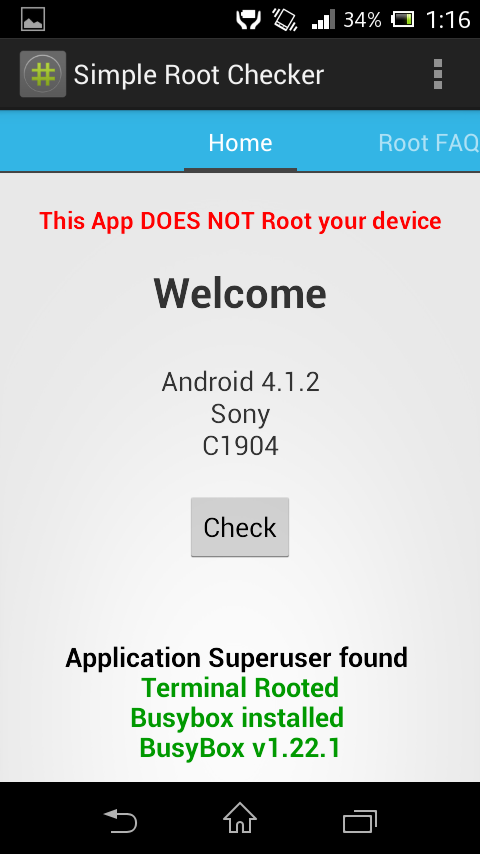
3.Install Simple Root Checker and check whether the phone is rooted or not.
If it shows Terminal rooted then Congratulations,if not then try step 2 again.
*Sometimes your phone will be rooted in the first attempt.I had try 2nd step 3 times to get my Xperia M rooted.
B- Installing BusyBox
When a phone is rooted, one of the most common things to do after rooting is the installation of the BusyBox binary, prior to running any applications that require root privileges.
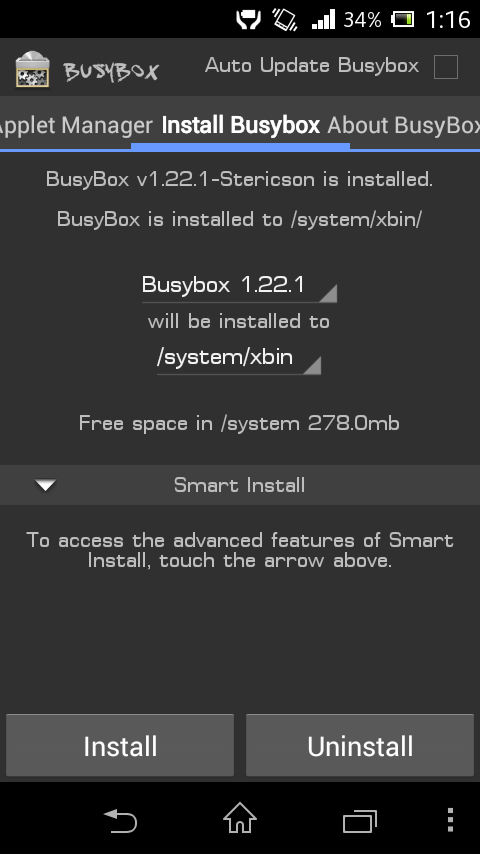
1.Download and Install BusyBox (free version) from Play Store
2.Launch it,Open Install BusyBox tab
 3.Select BusyBox latest version and select install directory to /system/xbin
4.Click Install
[Select Normal Install if prompted]
C- Installing Rootfixer from PC
1.Copy rootfixer to pc desktop and extract it
2.Go to Settings>Xperia>USB Connectivity>USB connection mode>Select Mass Storage Mode(MSC)
Then again go to Settings>Developer Options>Enable USB debugging
3.Connect phone to PC via USB cable
4.On PC,run supersu.bat as administrator and hit enter
Then it will show Installing the Rootfix
5.Then it will ask the device to grant supersu access
On the phone a pop up will appear asking access,Click Grant.
6.Then your device will restart.DONE....
Congratulations! Your Sony Xperia M is now rooted and you are a superuser which gives you full control over the device.

Owners of the Xperia M can now root both the C1904 and C1905 models running Android 4.1 Jelly Bean firmware.Using the Gandalf exploit, the Sony Xperia M can be rooted to allow owners to flash custom ROMs,gain full administrator privileges and swap the memory.
Be reminded that you need to meet all requirements before rooting the smartphone.
Prerequisites
1.The Framaroot rooting tool is only applicable to the Sony Xperia M C1904 and C1905 models. Never attempt the tool on other models or suffer unforeseen consequences.
2. Your Sony Xperia M must be unlocked from any network carrier.
3.Enable the USB debugging mode on your device. Go to "Settings > Developer options > USB debugging mode."
4.Create a backup of all personal information, settings and data files stored on the Xperia M.
5.Make sure that the battery level is at least 50 per cent.
6.Download the Framaroot tool .apk file to your device. You can download the file on the computer as well then transfer it to the SD card of the phone.
7.After rooting if the phone starts rebooting automatically then try using different version of Framaroot.
Warning: Rooting your Sony Xperia M will void warranty.
We are not liable for any warranty issues or errors which may occur on your smartphone.
Read, understand and follow the instructions carefully to avoid damaging your device. Do this at your own risk.
What we are doing here is
A.Roooting Download Framaroot 1.9.1 from MediaFire or 4shared
Download Rootfixer from MediaFire or 4shared
Download Simple Root Checker from Play Store
B.Installing BusyBox
Download BusyBox from Play Store
C.Installing Rootfixer from PC
Check out this youtube video tutorial Click Here
A- Rooting Procedure
1.Install and Launch the Framaroot app.
2.Click Install SuperSU and then select Gandalf Exploit.
[Do not select any other exploit as it can cause permanent problems on the handset].
Once the rooting process has been completed, you will see the following text:
"Success, Superuser and SU binary installed."*The rebooting may take some time due to the rooting process.
3.Install Simple Root Checker and check whether the phone is rooted or not.
If it shows Terminal rooted then Congratulations,if not then try step 2 again.
*Sometimes your phone will be rooted in the first attempt.I had try 2nd step 3 times to get my Xperia M rooted.
B- Installing BusyBox
When a phone is rooted, one of the most common things to do after rooting is the installation of the BusyBox binary, prior to running any applications that require root privileges.
1.Download and Install BusyBox (free version) from Play Store
2.Launch it,Open Install BusyBox tab
3.Select BusyBox latest version and select install directory to /system/xbin4.Click Install
[Select Normal Install if prompted]
C- Installing Rootfixer from PC
1.Copy rootfixer to pc desktop and extract it
2.Go to Settings>Xperia>USB Connectivity>USB connection mode>Select Mass Storage Mode(MSC)
Then again go to Settings>Developer Options>Enable USB debugging
3.Connect phone to PC via USB cable
4.On PC,run supersu.bat as administrator and hit enter
Then it will show Installing the Rootfix
5.Then it will ask the device to grant supersu access
On the phone a pop up will appear asking access,Click Grant.
6.Then your device will restart.DONE....
Congratulations! Your Sony Xperia M is now rooted and you are a superuser which gives you full control over the device.


